
Microgreens are young seedlings of plants that are widely used for decorating the dishes and for food. They are often added to salads, soups, cocktails, smoothies, and other drinks. All young seedlings contain vitamins C, E, K, minerals and antioxidants in much larger quantities than the adult plants.
On this page you'll find out how to grow microgreens at home. There are also presented some recommendations of the cosmetologist, nutritionist and dietitian, who explains why she chooses a particular variety of young plants, and her signature recipes.
The kale microgreens have a powerful beneficial effect on the cardiovascular system and normalize the level of cholesterol. They are useful for high visual loads. Kale also has anti-inflammatory, antiviral and antidepressant effects, promotes collagen synthesis.
In addition, kale is low in calories, which helps to reduce weight.
Kale tastes similar to a mixture of sorrel and savoy cabbage. So you can use it to cook almost any dish.
KALE

| We have in store for you: — high-quality seeds; — a convenient tray; — a perfect substrate. Follow the instructions, and you'll get fresh young seedlings in a week. |
How to grow kale?
1
Substrate preparation (Day 1)
Take the seeds and the label out of the container, soak the substrate in water at room temperature for 2 minutes, then drain off the excess water.

2
Sowing (Day 1)
Scatter the seeds evenly over the wet substrate. The seeds should cover the soil, but not be too close together. Water them with a sprayer. Remember to water every day, the substrate should not be dry.

3
Covering (Day 1)
Cover the tray not tightly with a lid, leaving gaps for natural ventilation until the seeds have sprouted. They germinate best in the dark.
Write the planting date on a sticker and stick it to the end of the container. This will help you know when to harvest.
Write the planting date on a sticker and stick it to the end of the container. This will help you know when to harvest.

4
Plant inspection (Days 2-3)
Check the moisture level daily. Remove the lid a couple of times a day for 10-15 minutes to air the young greens.

5
Germinating (Day 4)
After 2-4 days, when the cress seedlings start to rest against the lid, remove the lid and move the tray to a window sill in the sunlight.

6
Growing and watering (Days 5-7)
Don't forget to water your plants. It is best to water the plants in the morning. Young seedlings should be sprayed daily. At the bottom of the container, a constant water level of 2-3 mm shall always be maintained.

7
Harvesting (Day 8)
You can enjoy fresh kale as early as 7-10 days of cultivation. It is recommended to use kitchen scissors for cutting. You can cut the desired amount of the microgreens daily or harvest the entire crop and store it in the refrigerator in a plastic bag or container for up to 5 days (like any other salad).

“
It took 8 days to grow the kale microgreens, but you can also eat them earlier once the first leaves have developed.
— In addition to being low in calories, kale, like all green vegetables, is rich in fiber.
Kale is actually rich in chlorophyll, so its consumption helps fight cancer, improves liver detoxification, speeds up wound healing, helps improve digestion and controls excess weight gain.
Kale is rich in B vitamins, folic acid and antioxidants and holds the record for the content of potassium, calcium and vitamin A.
Darya Teslenko
Cosmetologist, nutritionist, dietitian
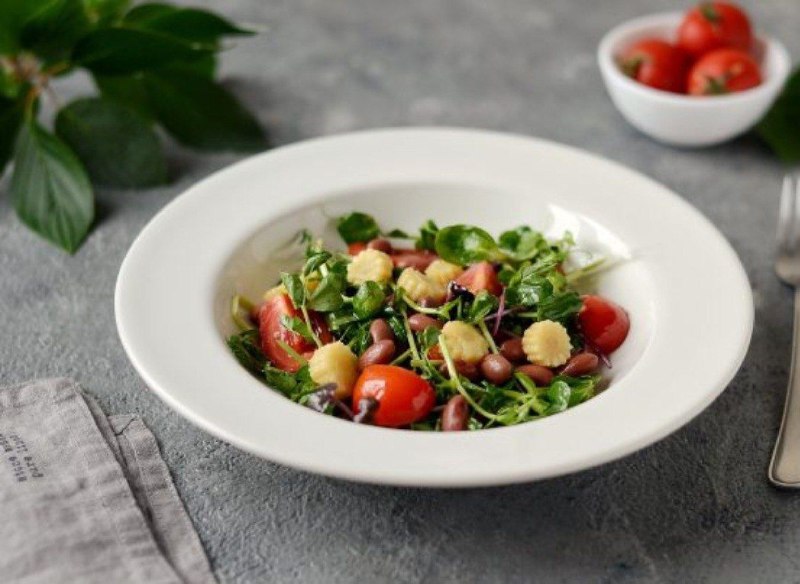
Kale Microgreen
Salad
Cut the cherry tomatoes into 4 pieces, cut the mini-corn into round slices.
For the salad dressing, mix the lemon juice, olive oil and topinambur syrup.
Add a dash of salt, stir.
Add the canned beans and vegetables to the bowl.
Dress the salad, add the microgreens, stir.
The salad is ready, bon appetit!
For the salad dressing, mix the lemon juice, olive oil and topinambur syrup.
Add a dash of salt, stir.
Add the canned beans and vegetables to the bowl.
Dress the salad, add the microgreens, stir.
The salad is ready, bon appetit!
Сooking method
— 80-100 g microgreens
— 80 g mini-corn
— 5-6 cherry tomatoes
— 100 g canned beans
— salt (according to your taste)
— 1 tablespoon lemon juice
— 80 g mini-corn
— 5-6 cherry tomatoes
— 100 g canned beans
— salt (according to your taste)
— 1 tablespoon lemon juice
Recipe